

This is a guest post by one of our blog writers, Sarah Joncas.
Distance learning has forced many teachers to figure out how to teach in a new virtual environment very quickly. One of the best ways to teach music from a distance is to create simple teaching videos that students can watch. In a few steps, you can create simple teaching videos for your students.
Equipment
A laptop, tablet, or phone with a built-in camera and microphone is all you really need to get started with simple teaching videos. Of course, you can use more advanced equipment if it’s available, but on-board hardware (the cameras and microphones your devices came with) are a good starting point. It’s also good to consider something to hold your device steady. That could be a music stand, a pile of books, or a dedicated tripod.
As for software, many different apps, programs, and websites will let you create simple teaching videos. Here are a few of my favorites:
- iOS Camera – this is the basic built-in camera app on iPhones and iPads. Just swipe over to video, hit the big red button, and record.
- iMovie (for Mac and iOS) – used for editing video clips right on your iPhone or iPad.
- Loom (cross-platform) – web based tool for creating video clips, including simultaneous screen and camera capture on most platforms
- Screencastify (cross platform) – an easy-to-use screencast recording tool
- QuickTime (Mac and PC) – simple video and audio recording app, can also be used for screen recording
- Edpuzzle (web based) – make any video interactive by adding questions throughout
- Flipgrid – (web based) the simple Flipgrid camera includes screencasting, whiteboard and face-to-camera option
- WeVideo – (web based) – this online video editing software app is popular with educators and works on all platforms
Screencast vs. Camera Capture
When making a video, you of course have to choose what will be shown on screen. There are two main choices – show who or what’s in front of your camera, or show your screen. A screencast, which shows what is on your screen, can be very useful for teaching students how to use a specific program or app. Camera capture – what we think of as traditional videos – can be a better tool for connecting with students or sharing a performance. Sometimes, a screencast with a small camera video in the corner can be the best solution for sharing a presentation or lecture. Before making your video, decide which you will use (or both – Loom is an easy way to use both simultaneously) and set up accordingly.
Recording
If you’re truly trying to keep your teaching videos simple, it’s ideal to record the whole video in one take. It’s not too hard to edit clips together, but keeping track of several clips can quickly become challenging and much time can be wasted re-watching them to know which one you want to use. If you’re going to put clips together, be sure to name them clearly so you know which ones you want to use in which order!
It’s ideal to record in a quiet place with a plain background. Cluttered backgrounds can cause the video to be out of focus, and can be very distracting. Most microphones will pick up ambient noise such as fans, so make sure to listen for these noises and adjust accordingly if needed. Consider lighting as well – no one will be able to see your face on camera if all the light is behind you.
Content
Please don’t record an hour long “lesson” and expect students to watch it and learn from it. Creating video content is very different from in-person teaching. Short, simple videos are the most effective. You can certainly draw from content you’d use in the classroom, but try to break up big topics into several shorter videos. For example, I typically teach one lesson on woodwind instruments. Instead of making one long woodwind video for distance learning, I broke up the videos, making an introduction, a flute video, a clarinet video, and so on.
I’ve found personalizing my videos to be really effective for engaging students. One way I’ve been connecting with students through video during distance learning is letting them request a song for me to perform and record for them.
Then, when I make a video for their song, I give them a quick “Shout-out” at the beginning of the video. So I might say “Johnny requested that I make a video for Twinkle Twinkle Little Star. Thanks for the request Johnny! I hope you enjoy it!” and then perform the song. It’s really simple and doesn’t take me much time, but kids and parents really appreciate it.
I’ve found it helpful to outline my video’s content before I record it. I usually don’t need a fully written out script, but having a rough list of talking points makes it easy to stay on track and keep the videos focused.
Considering Privacy
Some teachers are understandably concerned about their privacy when it comes to teaching videos. There are a few tips that can help you stay in control of your online privacy while making great teaching resources for your students:
- Be aware of what’s in the background of your videos. I try to use a blank wall so that students don’t see my entire home or personal belongings.
- If you’re taking a video outdoors, be aware of locations and landmarks and car license plates that might reveal information about where you are if you are concerned about students knowing your location.
- Consider posting videos inside of private platforms. For example, rather than posting public YouTube videos, post the video to Google Classroom or Canvas so only your students can see it.
- If you do post to Youtube or another video-sharing platform like Vimeo you can control the privacy settings. More on that below
- Don’t include anything you don’t want people to know – anything you post on the internet could be shared. Just be aware of what you share and it shouldn’t be a problem.
- Screencast videos give the option of not showing your face.
Video Platforms
Once you’ve made your video, where should you post it? The answer depends largely on your intended audience and what platforms your students are already using. If your classes use Google Classroom, it makes sense to share the video there. Ditto with Canvas or another LMS (Learning Management System).
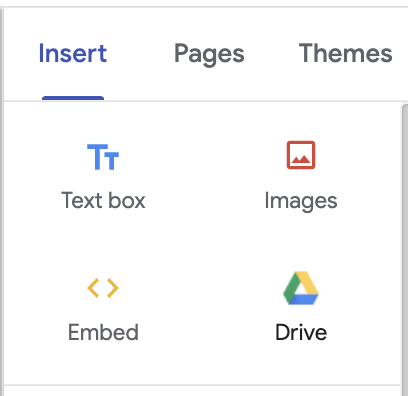
I’m not using an LMS right now, so I created a Google Site which has my lessons and videos. I upload the video into my Google Drive, change the share settings so students can view it, and then insert it into my Google Site by selecting “Drive” from the insert menu.
Google Drive, YouTube, and Vimeo are three well-known video hosting platforms. All three are easy to use, and allow for options regarding video privacy. YouTube “unlisted” videos are another good tool for teachers. Only those who have the link to the video will be able to watch it, rather than being able to find it through search.
Conclusion
Teaching videos can be a powerful tool for music teachers. You can create them with equipment you probably already have, and there are many different options for what to include in your videos. Teaching via video is certainly very different from in-person teaching, but it’s easy to get started with creating videos that let students keep learning. I even plan to keep some of the videos I created for distance learning to use back in the classroom whenever we get to go back to school. Learning to create teaching videos is a valuable skill, and one that any teacher will be able to figure out with a bit of practice.
Further reading and listening
- MTT76: Quick Free Screen Recordings with Loom
- MTT105: Tips for creating effective teaching videos that your students will WANT to watch
- MTT108: Making Teaching Videos with the Flipgrid Camera
- How To Make A Singalong Video In Flipgrid
- How To Make Follow The Bouncing Ball Videos Using Flipgrid
- Flipgrid For Music Teachers Step-By-Step
Download your copy
Would you like to take a copy of this with you? Click the button below and a copy of this will be sent directly into your inbox.
About the writer

Sarah Joncas is a music teacher from Massachusetts, USA. She teaches kindergarten through fifth grade general music, fifth grade chorus, fifth grade band, and percussion ensemble. Before becoming a teacher, she worked with technology and educational software.
In 2014, she was named a TI:ME Technology in Music Education Leadership Fellow, which allowed her to attend a music education conference in Texas and explore cutting edge music teaching technology. She has earned degrees in Music Education from the University of Massachusetts Amherst and Boston University. You can connect with Sarah on Twitter or her blog Teaching Music Musings.
Looking for More Resources for Music Teachers?
Hello! I’m Katie Argyle – an Australian music technology trainer and consultant with a passion for helping music teachers through my business Midnight Music.
I’m a qualified teacher but no, I don’t currently teach in a school. I help teachers through my online professional development space – the Midnight Music Community – where there are tutorial videos, courses, links and downloadable resources.

I like to focus on easy ways to incorporate technology into what you are already doing in your music curriculum through a range of creative projects. I also run live workshops and have presented at countless conferences and other music education events.
If you want simple, effective ideas for using technology in music education, I would LOVE to help you inside the Midnight Music Community.


2 Comments
Thanks for this blog! I’ve been thinking about using Google Site to upload all my teaching videos and accompaniment audios for students to play along with, but I’m stuck not knowing how to go about it. It’ll be amazing if MMC can do a webinar on using Google Site!
I’m not sure if I’ll end up doing a free webinar on it – it will likely end up being a new course inside the community since I think it’s going to make more sense with a series of walkthrough tutorials. It’s definitely worth considering. Super-useful!